-01-1.png?width=1200&height=238&name=Logo%20-%20Social%20(V001)-01-1.png)
 ·
4 minute read
·
4 minute read
.png?width=1024&height=512&name=Copy%20of%20Add%20a%20heading%20(2).png)
Social media is changing and you need to change with it.
Here's your complete guide to posting your first Instagram Reel.
Gone are the days when a simple post or image would suffice to keep you on top of your social media game.
Enter Instagram Reels, a fresh way to share content, connect with your audience, and present mortgage insights in bite-sized, engaging formats.
If you're yet to tap into the dynamic world of Reels, don’t worry. The hardest part is just hitting record!
But if you’re still struggling to get your first Reel published, this guide will walk you through the basics, ensuring you're well-equipped to publish your very first Reel and capture the attention of potential homebuyers.
What are Instagram Reels?
Reels are Instagram's answer to the short-form video content wave that has taken the world by storm. Think of them as 15 to 90-second mini videos or clips, allowing users to creatively express themselves.
That might be through snippets of their daily life, a tutorial, or showcasing their expertise in a fun and engaging way.
Complete with a suite of editing tools including audio, AR effects, and more, Reels give you the platform to create captivating content for your audience.
Why Should Loan Officers Be Making Instagram Reels?
For mortgage loan officers, Reels offers an unparalleled opportunity to demystify the home buying process, share quick tips, or even give a sneak peek into a day in your life, all while connecting with potential clients in an authentic and memorable way.
Instagram is one of the most popular social media apps, with nearly 2.5 billion active users. And as the app primarily focuses on pushing Reels in front of its audience, creating Reels should be a key part of any loan officer’s social media strategy.
They are easy to make, they are easy to share and repurpose on your mortgage TikTok account, and you audience already loves them. So make them!
Let’s get started with making your first Reel:
Your First Reel: a Step by Step Guide for Mortgage Professionals
Step 1: Open Instagram
Sure this probably seems obvious, but it is the first step.
Tap on the Instagram app on your mobile device to launch it. Ensure that your app is updated to the latest version to access all the Reels features.
Step 2: Navigate to the Reels Feature
Two ways to do this one:
- SWIPE right on the home screen to bring up the Create screen, which will activate your camera. Now just tap REELS on the bottom of your screen and you’re ready to go.
- TAP the + symbol in the menu at the bottom of your screen and tap REEL to bring up the Reels creation page. Tap Camera to activate your phone’s camera.
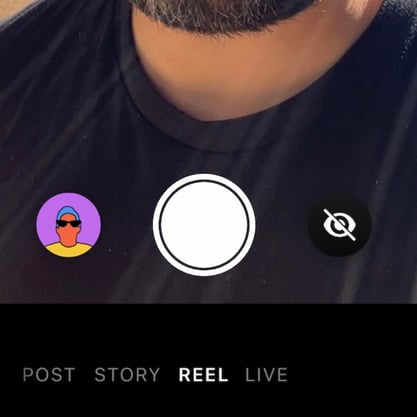
Step 3: Record Your Video
Decide which way you want the camera to face. To change to selfie camera: tap the circular arrows in the bottom right of the screen.
TAP the record button (the large white circle) to start recording. TAP again to stop.
You can also TAP AND HOLD the record button to capture video footage in real-time and RELEASE the button to stop recording.
You can record as many takes as you want by tapping the record button again. When the pink circle around the record button completes, you are out of available time.
Bonus tip:
Alternatively, if you wish to upload a pre-recorded video from your phone, tap on the gallery icon (usually a small square or rectangle in the bottom left).
Remember, your video can be anywhere from 15 to 90 seconds in length.
Step 4: Editing Your Reel
Once your video is captured or selected, you can make use of various editing tools:
Audio: Tap on the music note icon to browse and add a song from Instagram’s music library.
Speed: Adjust the speed of your video, making it faster or slower, with the speedometer icon.
Effects: Click on the smiley face icon to add AR effects to your video. Swipe left or right over the effects to choose the one that best fits your content.
Timer & Countdown: If you wish to record hands-free, use the timer icon. Set the duration, and once you tap record, there’ll be a countdown before recording begins.
Align: This tool is useful for smooth transitions, especially if you’re recording in multiple shots. It aligns your previous clip with the next one.
Trimming and Reviewing: After recording, use the trimming tool to adjust the length of your video or cut out sections you're not happy with. You can preview your Reel to make sure it flows well.
Drafts: If you're not ready to publish, tap on the back arrow at the top left and then choose "Save as Draft". This way, you can come back and edit or publish it later.
Step 5: Add Video Captions/Subtitles
This might seem like an odd choice, but adding captions to your videos will help you in tremendous ways.
Surveys show that audiences watch a LOT of video without sound on their phones. And if they can’t hear you, they should at least be able to read what you are saying.
To add subtitles to your video, tap the folded smiley face sticker at the top right of your screen to bring up the Effects menu and tap Captions. This will transcribe your audio and generate captions.
Then just tap and drag the subtitles where you want them in your Reel.
Step 6: Add Post Caption and Hashtags
Once you're satisfied with your Reel, tap Next in the bottom right to move to the share screen.
Here, you can write a caption for your Reel, add mortgage or homebuying-relevant hashtags, and tag friends or colleagues. Hashtags can improve your Reel’s discoverability.
Step 7: Choosing a Cover Image
Before posting, you can select a thumbnail or cover image for your Reel. Tap on “Cover” and then slide the video frame to select a preferred thumbnail.
Step 8: Sharing Your Reel
To Your Reels:
Tap “Share to” and then choose “Reels”. This publishes your Reel to the dedicated Reels tab on your profile and may also appear on the Explore page.
This is the ideal publishing location for your Reel if it's something that will have value longer than 24 hours from now. This is going to be almost all of your Reels.
As a Story:
If you'd prefer to share your Reel just for 24 hours, you can opt to share it to your Stories. This is best for Reels that are specific to something that is relevant for the next 24 hours only -- this could be an event, an announcement for a webinar, Instagram Live, or something you want to share for a brief window of time.
Step 9: Publish
Finally, tap on the “Share” button. Your Reel is now live for your audience to view, enjoy, and interact with!
You've Posted! What's next?
Don't worry if your Reel doesn't see a ton of engagement right off the bat. The most important thing is getting that first Reel out there and staying consistent.
The more you post, the more your Reels will show up in Instagram feeds for your audience. Try starting out with one Reel a week and increasing the amount over time to 2-3 Reels.
Make Reels Easier Than Ever with Video Catalyst
Want help with creating Reels for your Instagram? Video Catalyst from SocialCoach is the easiest way to create Reels.
With Video Catalyst, SocialCoach copywriters create scripts for you. Just record yourself reading the scripts, send them back and SocialCoach takes care of editing and captions to deliver a ready-to-post Reel in your SocialCoach content library. Click here to learn more about how Video Catalyst can help!
Want a demo of SocialCoach? Click here to Get a Demo!
-1.png)